Alternative Process Tutorials

Alternative Process Tutorial #7
Spotmeter Modification
Or
Measuring Negatives With An Index Card
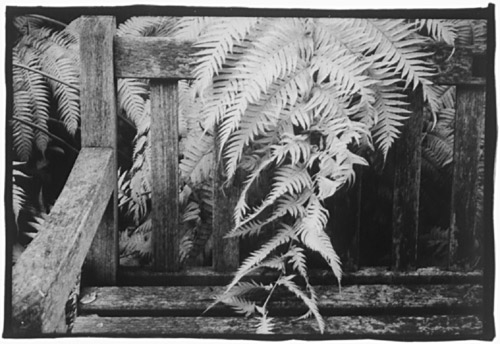
Illustration #62: Infrared Photograph
Copyright © 1992 by Tom Ferguson
Click on image for larger view

Illustration #63: Platinum Photograph
Copyright © 1991 by Tom Ferguson
Click on image for larger view
Negatives, like the scenes they contain, have a range of brightness values. This range of values is almost always greater in the real world, and compressed in the negative. If you project light through a negative, you can then talk about the negative in normal photographic terms, i.e. "the shadow of the chair is two stops brighter than the chair", instead of dealing with sensitometry, logarithmic math, and confusion.
The step wedge is our secret weapon in this activity. The Stouffer T3110 step wedge (see illustration#64) provides 31 stripes of varying opaqueness. Step 1 is virtually clear, step 31 is virtually black. These varying densities are each 1/3 stop darker than the next lower numbered strip. For example, step 5 is 1/3 stop darker than step 4. Step 7 is 1 full stop darker than step 4 (three steps of 1/3 stop), and 1 full stop lighter than step 10 (three steps of 1/3 stop).
We use the step wedge by matching a tone in our negative to a stripe of tone in the step wedge. You can do this either of two ways: a visual match (index card method) or a metered match (spot meter method). In the imaginary negative discussed above (a chair and its shadow), if the shadow matches step 4 and the chair matches step 10, then the chair and the shadow are 2 stops apart (six steps of 1/3 stop) on the negative.
Kodak also makes step wedges. Their common one "Step Tablet #3" is easier to find, but is set up in 1/2 stop steps (less accurate than Stouffer's 1/3 stops steps), and is typically more expensive.
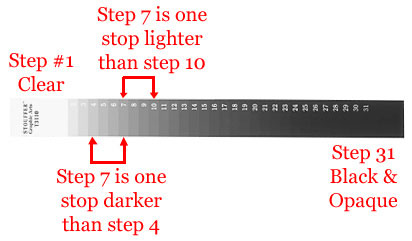
Illustration #64: Stouffer Step Wedge
Index Card Method
This is the simplest method, but does require you to be good at visually "averaging" an area of tones. Few places on a typical negative are a solid tone. Far more common is a mixture of different values. In order to use the index card method, you must be able to see these varying densities as an average.
Place both your negative and your step wedge on a light table (see illustration #65). Take two index cards and make a small (approximately 1/4 inch or 6mm) hole in the center of each. Either use a hole punch or an exacto razor blade.
Look at your negative and determine the brightest part of the negative that you hope to print with some detail (zone 2). This bright part of the negative will print as a very deep shadow tone. Place one of the index cards so that the hole is centered over this bright part of your negative. Now, take your second card so that the center hole is over step #1 of your step wedge. Move the second index card (on your step wedge) over the stripes of the wedge until you find the tone that best matches the tone visible in the hole over your negative (see illustration #66). Write down the step wedge stripe number you have matched.
Remove the first card (on your negative) and determine the darkest part of the negative that you hope to print with some detail (zone 8). This dark part of the negative will print as a very light gray/white tone. Center the hole in the index card over this dark part of your negative. Move the second index card (on your step wedge) over the stripes of the wedge until you find the tone that best matches the tone visible in the hole over your negative. Write down the step wedge stripe number you have matched.
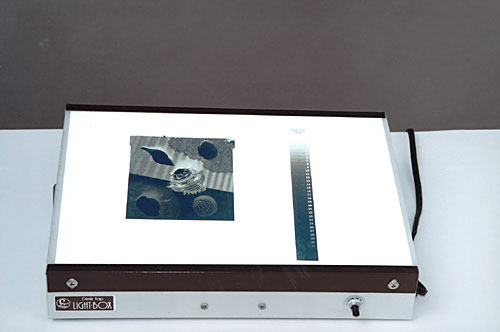
Illustration #65
Negative & Step Wedge on light box
Click on image for larger view
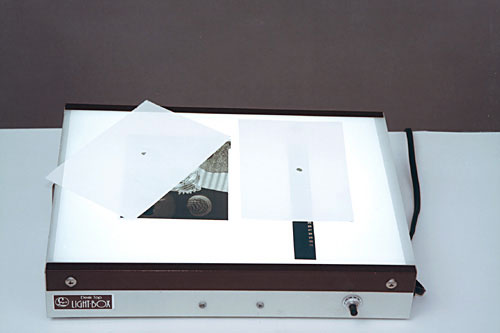
Illustration #66
Use of index cards
Click on image for larger view
Spot Meter Modification
If you aren't good at mentally averaging the image in the index card method (I'm only so-so at it, although many of may students have been excellent and "dead on accurate"), or if you just want more accuracy, here is a metering method using common camera gear you probably already own.
In order to do this you need five things: a steady source of light, a spot meter (hand held or in camera), a set of three close-up filters (diopters), a step wedge, and some black paper. See the material link at the bottom of this page for purchasing information. Why not skip the step wedge and use the meter reading directly? Two reasons: your light source may fluctuate over time, and meters aren't as linear as we think they are.
The light source is easy, I use the condenser head from my first "el cheapo" 35mm enlarger (see illustration #73 ). A common light table (used to view and sort slides) is also fine (see illustration #71). A light bulb in a vented wooden box, topped with frosted glass, will also work. Get some black paper and block all but the center square 1/4 inch (6mm) of the light source. This will help control flare in your meter.
Purchase a set (#1, #2, and #4) of close up filters to fit your one degree meter or camera. Tiffen makes these in almost any size imaginable. Assemble all three on your meter, with #4 closest to the meter (or camera) and #1 farthest away.
If you put 2 black paper "baffles" in between the filters (see illustration #69), you will have less flare and your readings will be more accurate. Make two circles of black paper that will fit inbetween your closeup filters. On the baffle that will be closest to your meter (between filters #2 and #4) cut a hole in the middle of the black paper circle that is 1/3 its diamiter. On the second baffle that will be farthest from your meter (between filters #1 and #2) cut a hole in the middle of the black paper circle that is 1/2 its diamiter (see illustration #70)
If you chose to use a camera (as opposed to a hand held spot meter), the camera must have, and be used in, a "spot meter" mode. A camera in an "average" or "matrix" metering mode will not work correctly. When using a camera, always use a fixed aperture lens (not a variable aperture zoom), with a lens between 50mm and 100mm, and set the focus to as close as possible (as far from infinity as the lens will focus).
Look at your negative and determine the brightest part of the negative that you hope to print with some detail. This bright part of the negative will print as a very deep shadow tone (zone 2). Place the negative on the light source so that the hole illuminates this bright part of your negative (see illustrations #72 and #74). Get a meter reading on this area. You will need to move the meter/camera closer and farther from the negative in order to find a focus point. Write down the step wedge stripe number you have matched.
Now, determine the darkest part of the negative that you hope to print with some detail. This dark part of the negative will print as a very light gray/white tone (zone 8). Place the negative on the light source so that the hole illuminates this dark part of your negative. Get a meter reading on this area, remember to focus by moving the meter. Write down the step wedge stripe number you have matched.

Illustration #67
Spot meter and close up filters
Click on image for larger view
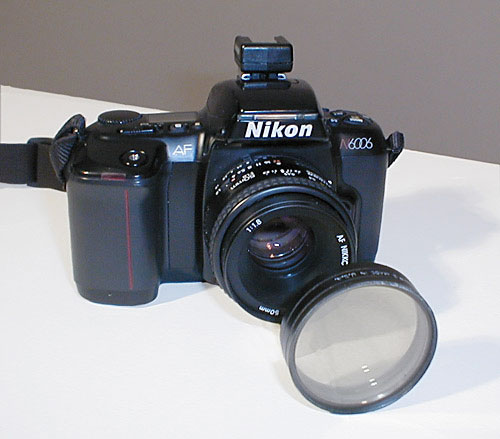
Illustration #68
35mm Camera and close up filters
Click on image for larger view

Illustration #69
Close-up filters and baffles
Click on image for larger view
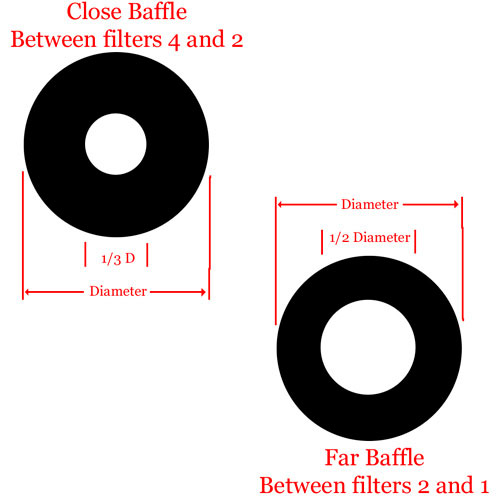
Illustration #70
Baffles cutout plans
Click on image for larger view
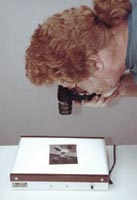
Illustration #71
Metering a negative
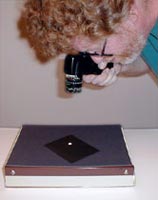
Illustration #72
Using a black paper aperature
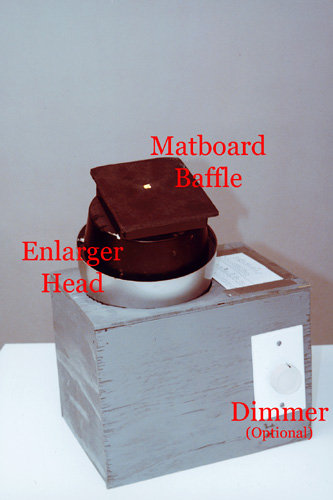
Illustration #73
Enlarger head as light source
Click on image for larger view
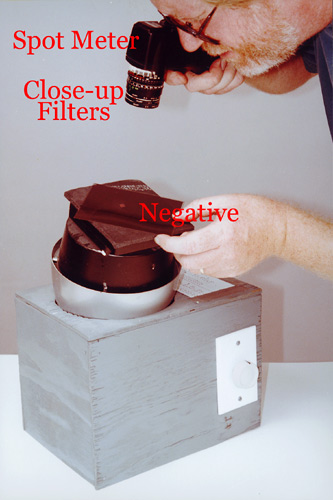
Illustration #74
Measuring with enlarger head
Click on image for larger view
You will use either of these measuring techniques throughout my tutorials. You will use the shadow value (the smaller step number) to determine print time (tutorial #15). By subtracting the shadow value from the highlight value you will determine the contrast range of the negative. This will be used to determine whether or not the negative is easily printable in a particular process or if it needs toning to work well (tutorial #20). In the next tutorial, you will use these methods to determine if you are giving your film enough exposure to get good shadow separation.
Click the "next" link below and we will continue our look at film choices and exposure for alt processes.