Alternative Process Tutorials

Alternative Process Tutorial #4
Coating Paper
Brush Coating Page: Part B
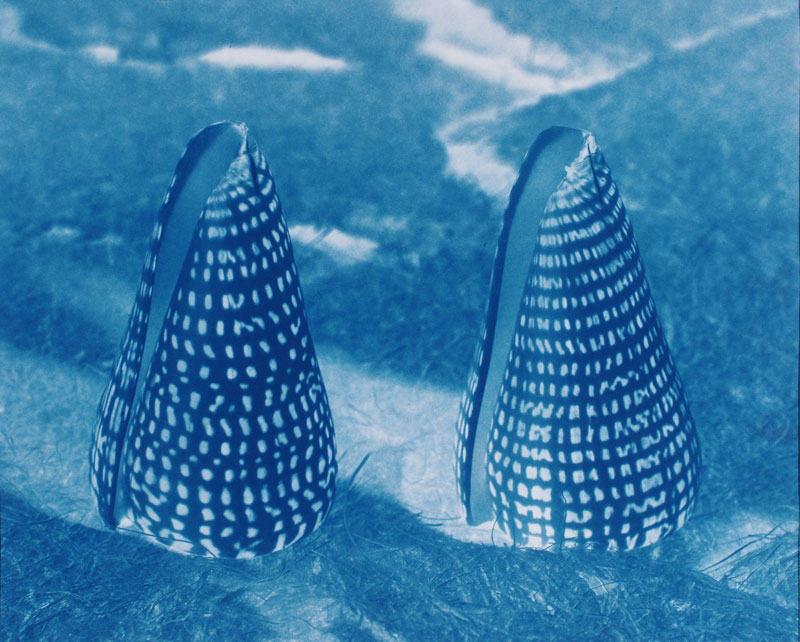
Illustration #27: Cyanotype Print
Copyright © 2001 by Tom Ferguson
Click on image for larger view
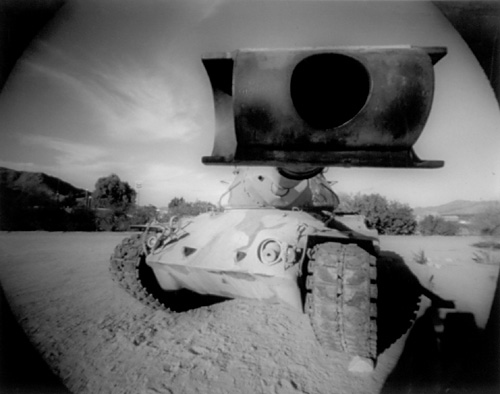
Illustration #28: Pinhole Photograph
Copyright © 1999 by Tom Ferguson
Click on image for larger view
Brush Coating Technique: Brushes come in a variety of styles (see illustration #29). House paint brushes of good quality are available at any hardware store and are great for big prints (larger than 8x10). Camel hair brushes are perhaps the best, but are quite expensive. They are available at better art supply stores. All of these I've seen are actually soft synthetic bristles, apparently no "camels" are used? Japanese style "Hake" brushes are available at most art supply stores. They are almost as soft (gentle to the paper) as camel hair and a lot cheaper. Their one failing is that they shed, and dropped bristles must be removed while the coating is still wet (see illustration #34). Hake brushes are probably the best ones to start learning with. Foam brushes can also be used. They are available at any hardware store and are very cheap, but will easily damage most papers. One must use a very light touch, and only use the tip area, not the side, when using these brushes.
Next, check your paper for "watermarks" by holding it up to a bright light, so that you are looking through it. Many papers have a front and back side, and these papers usually print best on the front side. If you see a watermark, you are looking at the front of the paper if the writing is correct, and the back of the paper if the writing is backwards. If you are working from a paper "pad", then the sheets are placed in the pad front side up.
Cut or tear your chosen paper to a size 5 inches (100mm) larger than your negative. If you have a 4x5 inch neg, make your paper 9x10 inches. On the front and in the center of the paper, mark 4 corners of a box 1 inch (25mm) larger than your negative with a pencil. This is the area of paper we are going to coat. With a 4x5 neg, you now have a 9x10 inch piece of paper with a 5x6 inch box marked on it. You will need to coat at least two sheets of paper for each negative you intend to print.
You will need about 0.75ml of solution for each 4x5 print or 2.5 ml for each 8x10 print. Determine the number of sheets you plan on coating and multiply to get the amount of solution you need. The coating solution is mixed by putting 3 parts of "cyanotype A" for every 2 parts of "cyanotype B" together and mixing them. This is called a 1.5 to 1 ratio. For example, assume we want to coat 10 sheets of paper for 4x5 negatives. This requires 0.75ml of coating solution per neg, so we multiply the number of prints times the solution needed per print (10 x 0.75ml = 7.5ml). Add to this 2ml to both to prime the brush (described below) and for a bit of extra. We then need a total volume of 9.5ml.
Mix the solution and coat the paper in subdued tungsten (common light bulb) lighting. Do not work in a room with sunlight or fluorescent lighting. See tutorial #3 for more information on working light levels.
Turn on your room's ventilation and put on your safety gloves (see tutorial 3). "Cyanotype A" makes up 3 of 5 parts in our formula. Multiply the total volume by 3/5 (9.5ml X 0.6 = 5.7). Measure 5.7ml of "Cyanotype A" with your 10ml graduate, then pour it into your mixing beaker. "Cyanotype B" makes up the remaining 2 of 5 parts in our formula. Multiply the total volume by 2/5 (9.5ml X 0.4= 3.8). Measure 3.8ml of "Cyanotype B" with your 10ml graduate, then pour it into your mixing beaker with the "A" solution. Give the mixture in the beaker a quick stir. Kept in their separate bottles, Cyanotype A will not spoil for many months and Cyanotype B will not spoil for many years. Once mixed together, the coating solution should be used within a few hours.
Note that most texts recommend mixing the solutions "A" and "B" in equal amounts (4.75ml of each in our example above). While this does make the math easier, I find the 3:2 formula above gives better images.
Next you must "load" or "prime" the brush. You only need to do this once per coating session. Pour out about 0.5ml of the coating solution onto the middle of a scrap piece of paper and simply coat it for a few strokes. This loads a bit of chemical into the dry brush.
Pour the amount of coating solution needed (0.75ml for 4x5 negs, 2.5ml for 8x10 negs) into your smaller 10ml graduate. Masking tape the paper to be coated down onto your work table, so that it can't move, Pour the coating solution out of the graduate and onto the paper in a line or "bead" just outside one of the short sides of your penciled "box" (see illustration #30). Once you have poured the coating solution onto the paper, you need to work and finish quickly, or your paper may be "splotchy". Now, using a minimal amount of pressure, paint the solution left and right until the "boxed" area is coated (see illustration #31). This is close to painting a wall with house paint, except for the need to use light pressure. The paper is being coated is "wet" and can be easily "roughed up", causing loose strands or "balls" of paper that may not coat correctly. Next, move your painting strokes 90 degrees so that you are painting up and down (see illustration #32). Paint the entire "boxed" area in this new direction. Do not worry about painting "out of the lines", no harm is done.
If any brush bristles or dust has fallen into the coating, quickly wrap a piece of masking tape around your finger with the sticky side out. Just barely touch the bristle with the tape, and it should lift right off. Quickly give the paper one more pass with the brush to hide any imperfections left from the tape (see illustration #34).
Many papers will require you to continue painting for a few cycles (first left and right, then up and down). Stop when the paper is evenly covered and colored inside the "box", added brushing only risks damaging the surface of the wet paper. My suggested volume of solution per image is for papers of average absorbency. Soft papers (absorbent papers) will need more solution , hard papers (well sized papers) will need less. Even your relative humidity can alter this. So, don't be afraid to use more if you can't get an even coat, or less if you always have a puddle left over.
Put the paper in a totally dark space and let it air dry. You should not use heat in drying the paper, it can fog the papers highlights and change its contrast. Heat will also put more fumes into the air for you to breath. Once the paper is completely dry, you are ready for tutorial #6 (where you finally get to make a print!). Do not try and use an "almost dry" sheet of paper, as this can damage your negative.
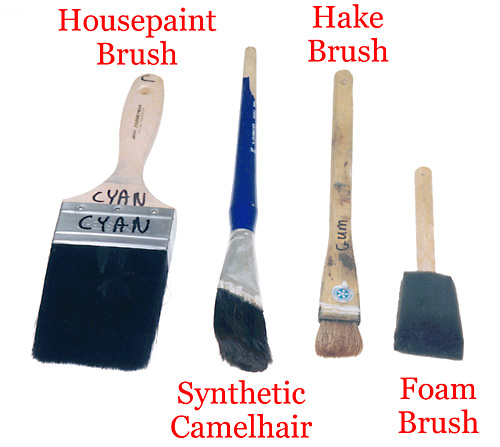
Illustration #29: Brushes
Copyright © 2001 by Tom Ferguson
Click on image for larger view
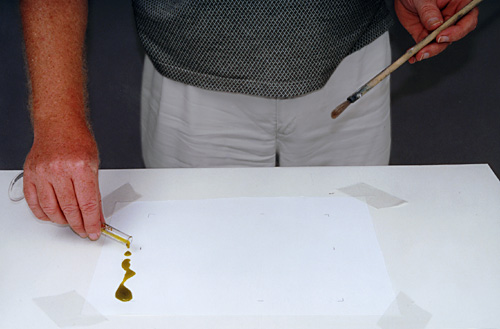
Illustration #30: Pouring out chemicals
Copyright © 2001 by Tom Ferguson
Click on image for larger view
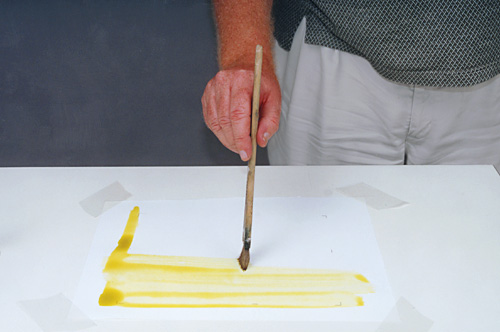
Illustration #31: Brushing left to right
Copyright © 2001 by Tom Ferguson
Click on image for larger view
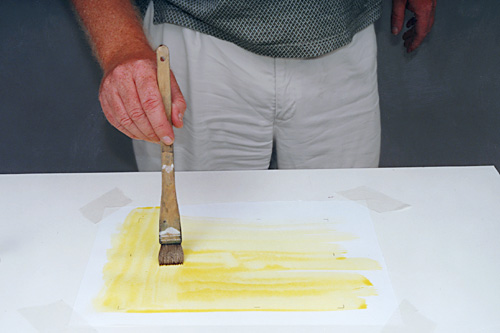
Illustration #32: Brushing top to bottom
Copyright © 2001 by Tom Ferguson
Click on image for larger view
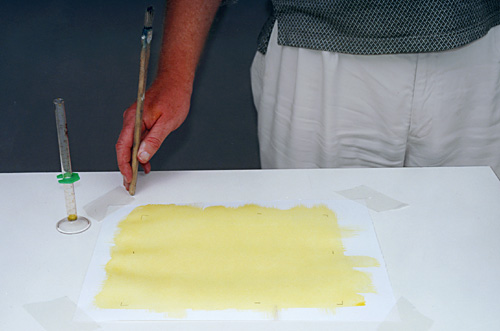
Illustration #33: Finished
Copyright © 2001 by Tom Ferguson
Click on image for larger view
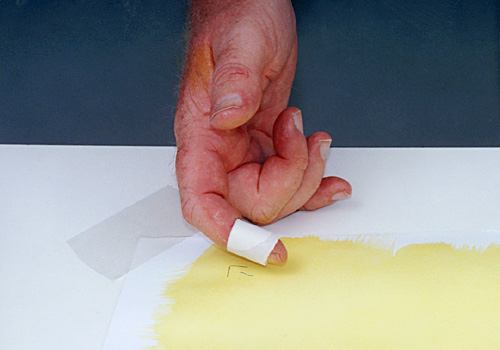
Illustration #34: Removing hairs or dust
Copyright © 2001 by Tom Ferguson
Click on image for larger view
Click here to view Rod Coating Page
Click the "next" link below and I'll describe how to expose and develop your first cyanotype print.